 Welcome to Olli Ella!


DIY | Easter Eggs
It’s almost our favourite time of year! Easter is just around the corner. We’ve got the baskets covered, but what about the eggs!? Here’s a fun weekend recipe for some hand-dyed Easter eggs using natural materials that are sure to get you in the Easter spirit!

Let's Get Started...
-
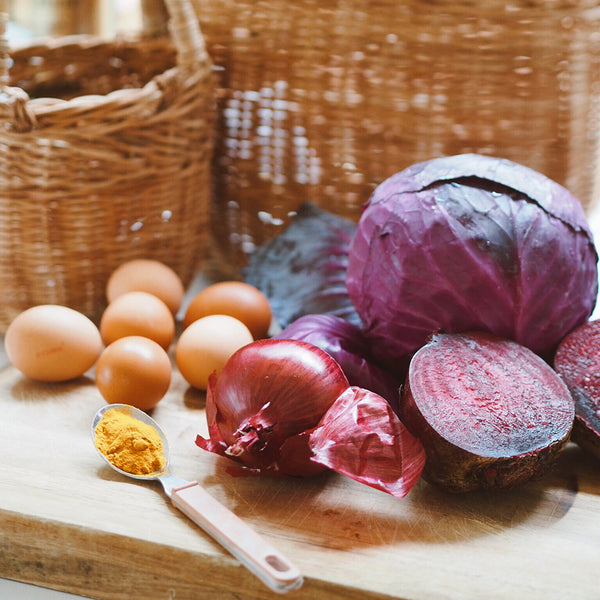 01You will Need
Eggs, 1 Cup Red Onion Skins (Purple), 1 Tbsp Turmeric (Yellow), 2 Cups Peeled & Grated Beetroot (Pink), 2 Cups Shredded Purple Cabbage (Blue), White Vinegar, Water, 4 Pots (for boiling water), 4 Bowls, 1 Strainer. -
 02Prepare the Eggs
To begin, remove the yolks from the eggs by using a sharp object to poke a small hole in the top and bottom of each egg, then slowly blowing the yolk through the eggs into a bowl. Once all the eggs are empty, you’ll have beautiful, hollow eggshells and you can use the yolks for breakfast! -
 03Create the Colour
Now, place all of your prepared ingredients in individual pots on the stove and fill each pot with water (enough to cover the ingredients) and 1-2 tablespoons of vinegar. Bring the water to the boil, then turn the heat down to a simmer and wait until the colour begins to develop. -
 04Let Colour Develop
Leave the pots on the stove to simmer until the water in each pot has reached your desired level of pigment. This should be between 20-60 minutes. -
 05Strain
Once the water is the perfect colour, use a strainer to pour it into seperate small bowls or jars and add the leftover ingredients to your compost. -
 06Dye the Shell
Carefully add your eggs to the jars and let them absorb the colour overnight! Keep in mind that the colour of the eggshell will alter the end result. Lighter eggs will work best for blues and purples whilst darker eggs are great for orange and red tones. -
 07Finishing Touches
Now your eggs are ready! You can lightly brush the eggs with coconut oil for a bit of shine… -
 08Done!
...or sprinkle on some eco-glitter for that little something extra! You're done! Enjoy the hunt!
 01You will Need
 02Prepare the Eggs
 03Create the Colour
 04Let Colour Develop
 05Strain
 06Dye the Shell
 07Finishing Touches
 08Done!
