Happy Halloween (almost)! We’re starting things early this year - the arrival of the Dinkum Dolls got us so excited to make some tiny outfits for spooky season and we just couldn’t wait! You may still be scrolling to find this year’s winning costume, but we’re here to provide you with some classic Halloween inspo in the form of three adorable mini costumes that you can recreate at home! So crack open the Candy Corn and pour yourself a Pumpkin Spiced Latte - it’s time for a festive crafternoon! - Don't forget to download your costume pattern.
~

-
 01You will need
To create a tiny tail and two adorable ears, you will need some firm black felt (rather than soft, fluffy felt), scissors, black embroidery thread, a needle and two large hair elastics. -
 02Cut the pattern
First cut out your pattern pieces using the pattern provided. You should have two small triangles for the ears and one long triangle for the tail. -
 03Sew the tail
Fold the long triangle in half length-ways and sew along the edge to create a triangular tube. -
 04Fill the tail
Fill the tube with felt scraps and sew it onto a hair elastic like so. This will create the tail! You can use any elastic you have at home, provided that it's large enough to fit around the Dinkum Doll's waist. -
 05Create the ears
Now sew each ear onto the hair elastics. Keep in mind that as the elastic stretches, the ears will spread further apart. -
 06Done!
Now your spooky Black Cat costume is done, how easy was that!

-
 01You will need
For you Wicked Witch's Hat, you will need some black felt, scissors, black embroidery thread, a needle, some twine or ribbon and a hot glue gun. -
 02Cut the pattern
Start by cutting out your pattern pieces. You should have a large circle for the base of the hat and two triangles for the top.
-
 03Sew together
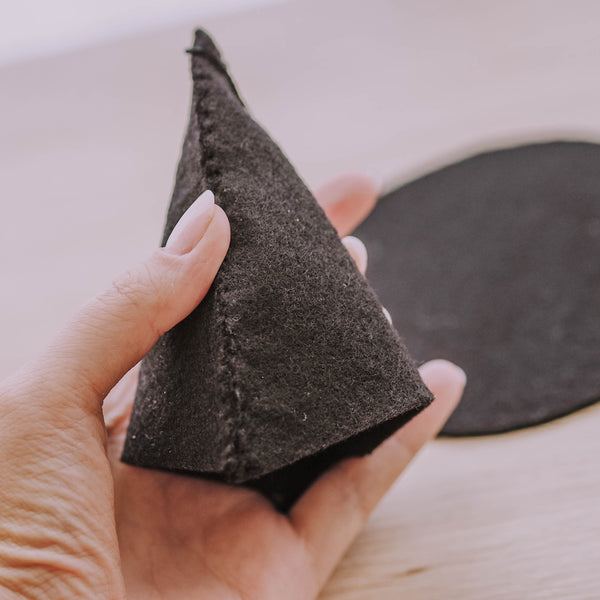
Sew the two longest sides of the triangle together like so, leaving the bottom of the triangle open. -
 04Create a cone and fill
Once sewn, pinch the triangle into a cone shape like this then fill the inside using felt scraps. -
 05Attach the base
Carefully use a hot glue gun to glue the base of the cone to the circle of felt to create the hat. -
 06Finishing touches
Add some dried flowers and glue on the twine or ribbon to secure the hat under your Dinkum Doll's chin. Just like magic... your Wicked Witch is done!

-
 01You will need
For the cutest costume of all, you will need some orange felt, scissors, orange or brown embroidery thread and a needle. -
 02Cut the pattern
Cut out your pattern pieces using the pattern provided. You should have eight leaf-shaped pieces of felt.
-
 03Sew together
Begin by sewing the pieces together down one side of the leaf shape, like so. -
 04Keep sewing
Continue to sew each piece to the next until your pumpkin begins to form. The curve in the pattern pieces will give your pumpkin a nice round shape. Feel free to stitch the pieces together with the stitches visible on the outside or inside. Here you can see the stitching done both ways. -
 05Create the neck hole
Sew all of the pieces together, leaving a gap at the back. Then use your scissors to cut a large hole around the top of the pumpkin like this. The hold should be roughly 3" in diameter. Don't worry about cutting through the stitching - we'll fix that up later. -
 06Create the leg holes
Next up, use the pattern provided labelled "leg", to trace and cut the leg holes at the bottom of the suit. The holes should be roughly 2" apart from one another. -
 07Create the arm holes
Then use the semi-circle pattern provided labelled "arms" to trace and cut two dips for the arms under the neck hole. You can now slide the pumpkin suit onto your Dinkum Doll by popping their legs through the leg holes and pulling the suit up over the body. The opening at the back should overlap like this. -
 08Attach the straps
Now it's time for some straps. You can cut out two strips of felt and sew them to the suit like we did, or you can use some coloured ribbon. -
 09Finishing touches
Secure any loose threads by sewing over the stitching. -
 10Finito!
Now your Puffy Pumpkin Suit is complete! Trick or Treat!
 Welcome to Olli Ella!


 01You will need
  02Cut the pattern
 03Sew the tail
 04Fill the tail
 05Create the ears
 06Done!
 01You will need
 02Cut the pattern
 03Sew together
 04Create a cone and fill
 05Attach the base
 06Finishing touches
 01You will need
 02Cut the pattern
 03Sew together
 04Keep sewing
 05Create the neck hole
 06Create the leg holes
 07Create the arm holes
 08Attach the straps
 09Finishing touches
 10Finito!
In my opinion, with the help of such posts you can make a very beautiful toy, not wasting much money. Thank you for sharing this instruction. Also, there is some information on extra report .